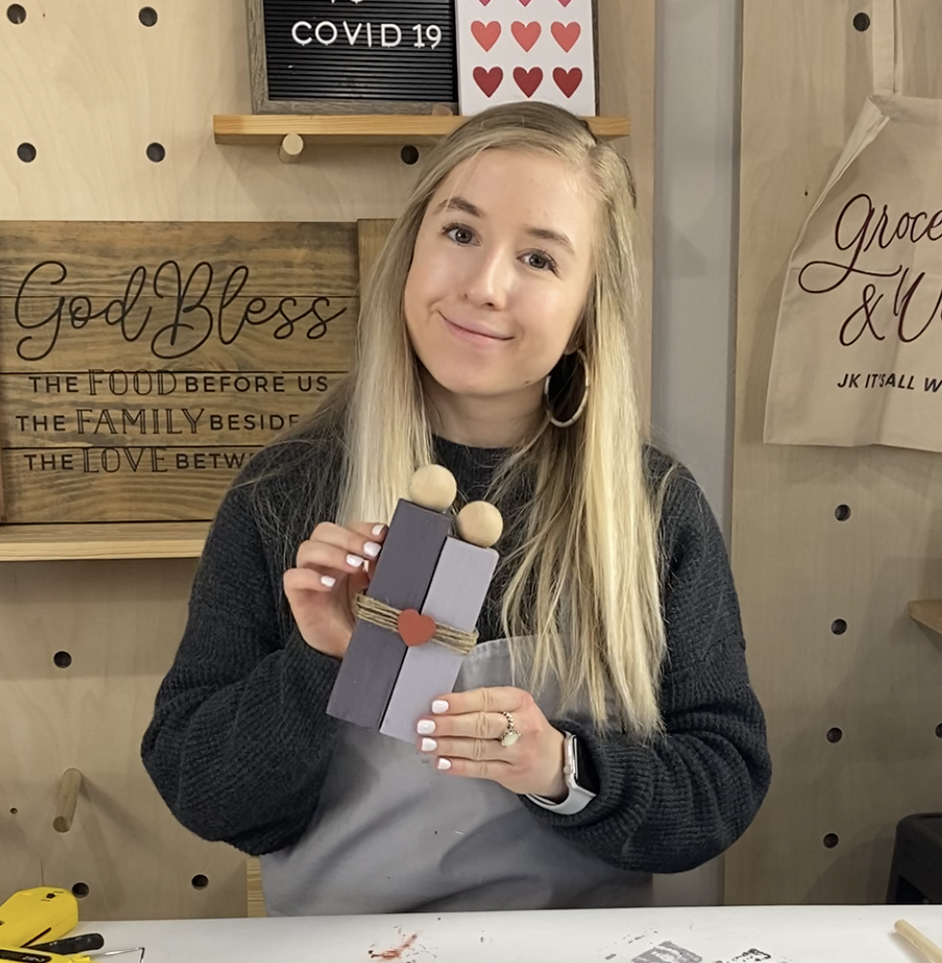
ADULT Crafts
WILLOW TREE INSPIRED PEOPLE
Posted on February 1, 2021

This project is such a fun way you can easily add a farmhouse element to your home. You’ve probably seen some similar decor for a good bit more expensive, but these give you all the cuteness and customization for less!
SUPPLIES & TOOLS
- (2) Wooden pieces – ours were 1.5×1.5×6″ and 1.5×1.5×5.5″ (the ones on the amazon list are expensive, but you can get scrap wood from a lumber yard or home improvement store!)
- (2) Wooden ball knobs – ours came from Hobby Lobby, had a flat surface on the bottom, and were 1.25″
- Paint – at least 2 colors
- Twine
- Wooden heart – also came from Hobby Lobby and were 1″
- Sand paper
- Scissors, Hot glue gun, Paint brush
Amazon shopping list for easy ordering! Check it out here.


Step 1: Gather and ready your materials
Pick two paint colors that you like together and also think about “who” these people are that you’re making. If they’re your sister or your mom you may want to do two shades of pink or purple. If it’s a dad and son, two shades of blue. Or you can stick with a more versatile version and paint them both white like normal Willow Trees.
Sand wood pieces. Make sure to sand all sides because you will want to paint all sides.
Paint wood pieces. If you’re painting both pieces white then it doesn’t really matter what piece you do first, but if you have two shades of a color, paint the lighter shade first so you can use the same brush for the darker shade.
Paint heart. Don’t forget the sides (and the back too if you’re picky).


Step 2: Glue rectangles
If there are any blemishes in the wood, put your glue on that side so you won’t be able to see it. It is important to make sure they stand up straight so put them together and then press their ends on the table as you wait for the glue to dry.


Step 3: Grab your twine!
Cut twine. Decide how thick you want your twine to be and cut enough so it wraps around like you want.
Glue twine. Glue one end of the twine to the back of the wood pieces in the crack so it looks neat.
Wrap twine around wood pieces. Wrap the twine to create the look you want. You can wrap it tight and in straight lines or you can wrap it loosely in a random pattern.
Glue twine. Glue the other end of the twine to the back like you did the first end. If it looks like you might not have enough to reach, unravel it once and cut it so it lines up right.

Step 4: Glue on the heart
Position the heart in the center of the twine and make sure you’ve got enough glue so that it doesn’t cause the twine to sag.

Step 5: Glue knobs
Grab your hot glue gun and put glue on the flat part of the knobs one at a time. Put enough, but not too much that it leaks out the side. Make sure they are centered on the top of the wood pieces (who wants crooked heads?!). Push hard so they stay where you place them. And Voila! You have Willow Tree inspired people!